Thursday, February 24, 2011

Week 5 Preview

Block completed by Jacqui at Treadle Quilts
This week, we feature Ann's Folly by Jacqui over at Treadle Quilts. I just love how she fussy cut the center piece to have the star in it! She has many Dear Jane blocks posted as well as several other projects. Go check it out!

Ann's Folly is located in slot K6. We will both be doing it with template and paper-piecing. With luck, there will be very detailed instructions to help you complete your block.

Well, that was for the missed block last week. The block for this week is Anna's Anchor in slot J8.

Block completed by Melanie at Crazy About Quilts
For our second block of the week, we feature Anna's Anchor by Melanie at Crazy About Quilts! It looks like she has been working very hard on her Dear Jane quilt. Please stop by her blog and show some love.

Also, we will be tasting another new beer!

Review of Kentucky Bourbon Barrel Ale & an apology

First, we have to apologize.  We did not get a Dear Jane block completed this weekend.  We will try to get 2 done this coming weekend.  Shhhh.  Don't tell Holly!  I didn't ask her first.  LOL.


Kentucky Bourbon Ale gives off a rich, sweet, yeasty aroma. It has a lovely medium dark amber brown color. I've never had bourbon before (I know. It's probably some kind of tragedy to somebody out there. I apologize.) But, this beer makes me want to try it! I'm guessing it's the bourbon flavor that's coming through. This ale goes feels smooth going down. The first time I ordered this was at a bar in Dublin. Uh, don't get too excited for me. It was Dublin, OH :D Anyway, they served it up in a brandy snifter. It did add way more charm than drinking it out of the bottle, but it's yummy either way! I think it's my new favorite! Fun fact: this ale has an alcohol volume is 8.1% I give it 5 thimbles and it isn't even pink!
Holly

I just loved the aroma from this bottle of Kentucky Bourbon Barrel Ale. The color was a very nice red clay color. The flavor was unexpected. I expected more beer than bourbon and was surprised to find that the bourbon flavor came soaring through. The beer went down smoothly and I found myself shocked when I went to take another drink and the glass was empty. It was lovely. I give this one 4.5 thimbles!
Mary

Tuesday, February 15, 2011

Special Valentine Review of Brasserie de Silly's Pink Killer

We decided to taste-test a special beer for Valentine's Day. A pink beer called Pink Killer. Not only is the label pink, but the beer. It is based on malt, wheat and pink grapefruit. Yum!

Dude! It's. PINK. beer. That should be nuff said to make you want to go try some. Ok, it's a pink malt beverage. But we decided that was beer like enough to qualify. Pink Killer has a pleasing perfume like aroma. It tastes like a not so sweet artisan soda...which translates to: I don't really taste alcohol. The "killer" has a nice mellow grapefruit flavor. Yum! I give this 5 thimbles. I was gonna give it 4, but it's pink! So it got a style point. Lol
Holly

As I poured this in the glass, I became excited by the lovely grapefruit pink color. After I enjoyed staring at it for a while, I picked the glass up off the counter and smelled it. You can smell the grapefruit and the orange in it. At first sip, you get the bitter of the pink grapefruit. All I can compare it to is a mix of grapefruit juice and champagne. I drank every last drop!Not only does the bottle have a pink killer dog on the label, but the cutest pink dog collar printed on the label around the neck of the bottle. 5 thimbles from me, too!
Mary

Review of Loose Cannon


This week, we reviewed Heavy Seas' Loose Cannon made by Clipper City Brewing.  Hop on over to their site and check out the details!

Loose Cannon has a honey color when poured and not much head. There's definitely a citrusy aroma to it. It has a sour grapefruit taste which I like. This would be really great ice cold on a hot summer day! I give this one 4 thimbles. Me likey :D
Holly

Loose Cannon has a nice aroma both in the bottle and in the glass. It is definitely citrusy. I wasn't careful pouring it and ended up with more head on the beer than beer. I had to scoop as much as I could out with a spoon. I know, bad beer drinker. Oh well. I did not like the bitter taste and the after taste was even worse. I couldn't finish this one. I give it 1 thimble.

Mary

Monday, February 14, 2011

Alison's Guiding Light

Alison's Guiding Light is a relatively simple block, but at 4.5 inches finished, the pieces are tiny. Some of the pieces have seam allowances that are bigger than the piece you see.

Holly and I both did this block as a template block and then as a paper-pieced block.

Tamplate Method:

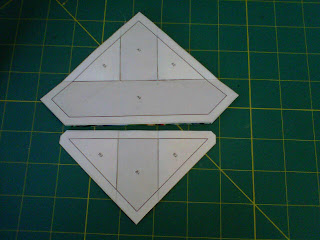
Templates for Alison's Guiding Light
 Holly and I both used the templates in the picture (we figure if we share the templates through the whole quilt, we could save a small tree!) to cut our fabric for this block. Holly cut her pieces old school.  She laid the template piece on top and held it there with no pins while cutting with her trusty scissors. I, on the other hand, took the templates and fabric to my cutting mat and used a rotary to cut out all the pieces. For the last 2 blocks, I cut mine out the old school way and was having trouble with it. I found the rotary to be much easier for me to handle.

Pieces cut using templates
 Unfortunately, we both forgot to take any pictures between cutting out the pieces and the finished block.  Oops. The best we can do now is tell you how we sewed them together.

We started by sewing 2 of the purple triangles to the white stick (on an angle above) that goes between them. Once we had 4 units like that, we sewed 2 of the small white squares to one of the outer purple sticks as laid out above. You should have 2 of these units. After pressing, we sewed 2 of the units that used the purple triangles to the straight white sticks on either side, yielding 2 units. Next, we sewed the 2 large units to either side of the long white stick in the middle and then the 2 remaining outer purple sticks to opposite sides of the full unit. Last, sew the 2 units of purple sticks and small white squares to the sides you didn't sew the outer purple sticks to. Use a finished block or a diagram as your guide.

Mary's finished Template-pieced block
 Hopefully, your block turns out as nice as mine (above) and Holly's block did.  :)

Now, for the paper-pieced block...

Paper Pieced Method:

Paper-pieced template
Above is the template we used for our paper-pieced block. Unfortunately, we had to use 3 prints of that for our 2 blocks due to a couple of mistakes. Oops. We also didn't take any pictures as we constructed this block. Oops again! What were we thinking? We will definitely try to do better next time...I promise!

Anyway, to construc the paper-pieced block, the order printed on the pieces works great. Follow carefully and you should be fine. One tip, though...once you start piecing units together, make sure you remove some of the paper bits as you go or they are sewn in there forever. Mine will forever have a few bits of paper inside of it.

Now, for the comparison. I found it harder to get my corners and points to line up with the paper pieced pattern on this one. For this block, for me, the template pieces were definitely better than the paper-piecing.

Our finished blocks
Pictured above are mine and Holly's finished blocks. Paper-piecing on the left and template piecing on the right. Holly's on top and mine on the bottom.

Feel free to link pictures of your blocks up on the right of the blog and share any tips you may have or problems you discovered in the comments.

Mary

Thursday, February 10, 2011

Week 3 Preview

I know it is a little late notice, but I have been running behind all week. This week, we will be making the block called Alison's Guiding Light.

This block was done by Lady Hopwood from A Stitch in Time.  Go check out her blog at http://primrosegirl.blogspot.com.

Picture from http://primrosegirl.blogspot.com/

We will do both the paper-pieced block and one using templates. YAY!

We will also be taste testing Clipper City Brewery's Loose Canon.

Picture from http://www.hsbeer.com

Wednesday, February 9, 2011

Review of Belhaven Brewery's Scottish Ale


Oddly, it smelled a bit like skunk.  It tasted way better than it smelled. It tasted slightly burnt with a tasty nuttiness flavor and a bitter finish. My apologies to the other beer aficionados that think this is wrong, but I like it better with the addition of butterscotch schnapps...as I do with most beers that are too bitter for me. Try it, it's tasty!  :)  2 out of 5 thimbles.
Holly

This beer had an oddly familiar smell that I just couldn't put my finger on, except that it smelled like beer. Maybe it reminded me of the smell of a bar or the a bowling alley...not sure which. When poured, there was very little head on it.  In the bottle, it was a golden caramel color, but once poured into the glass, it took on a ruby hue. The taste was bitter to the tongue, but left a smooth after taste and went down well. I give it 3 out of 5 thimbles.
Mary

Leave us a comment letting us know what you think of this brew!

Sunday, February 6, 2011

Thanks to Karen & Adelaine's Apron Strings

I would just like to thank Karen. She made the following comment:
Blogger Karen said...
Mary & Holly, You have 2 blocks done already & I haven't started yet, piffle, I forgot! Are you going to share pix at all of how the blocks are made or should I go by the software which I still haven't installed? I will have to come into the shop & talk to you about them. I also need advice on receiving your Blog thru Goggle. Have fun! Karen
We will definitely try to get better at including our construction process with the posts.  Also, if you would like to receive the posts by email, sign up to be a follower.  There is a "Follow" button on the right side of the blog.

Week 2 has us making Adelaine's Apron Strings which is located in spot J4. We made this block 2 ways. We paper pieced one and then used templates for the second. 

Paper Pieced Method:
     Tips -1.  Set your stitch length to 1.5 to make it easier to remove paper after sewing
              2. Sew through all the seam allowances...don't stop when the bold line ends.  Go to the dotted line
              3. It is easier to trim the seam allowance if you use a "add a 1/4" ruler

Paper Piecing Template from EQ6


Rough cut the 2 pieces
Place the fabric for A1 face up on the back of the template and the fabric for A2 right sides together with A1 fabric and sew along solid lines  **NOTE** SEW ALL THE WAY THROUGH TO THE DOTTED LINE
Before you press, fold paper along sewing line and trim to 1/4 inch seam allowance
place fabric for A3 right sides together as shown and sew along solid lines
Trim seam allowance to 1/4 inch and press
place fabric for A4 right sides together as shown and sew along solid lines
trim seam allowance to 1/4 inch and press
flip over and trim along dotted lines...
and now you have a sailboat!
mine and Holly's sailboats in the water  LOL
place and sew the fabric for B1, B2 and B3 (one at a time) and sew along the solid lines
trim seam allowances to 1/4 inch and press
flip and trim on dotted lines
B piece after trimming
align edges from piece A and piece B
sew along solid line  **ALL THE WAY THROUGH THE SEAM ALLOWANCE**
remove all paper pieces from fabric
press last seam as shown
Holly's finished block
my finished block


Template Method:

These are the templates cut out


My pieces cut using the templates


After sewing and pressing one triangle to each side of the blue pentagon

After you sew on the remaining triangles, you should have 2 of these

Sew bi-color triangle onto the middle piece

Sew on the other side

my finished block...YAY!
Holly's finished block
This block was a whole lot easier than the first block we did (click here to see block 1). If you have been following along, we would love to see the blocks you have made!

Don't forget, we are having a giveaway on this blog.  Go here to get your name in for the giveaway! 

Mary