-
 Karen said...
 - Mary & Holly, You have 2 blocks done already & I haven't started yet, piffle, I forgot! Are you going to share pix at all of how the blocks are made or should I go by the software which I still haven't installed? I will have to come into the shop & talk to you about them. I also need advice on receiving your Blog thru Goggle. Have fun! Karen
Week 2 has us making Adelaine's Apron Strings which is located in spot J4. We made this block 2 ways. We paper pieced one and then used templates for the second.
Paper Pieced Method:
Tips -1. Set your stitch length to 1.5 to make it easier to remove paper after sewing
2. Sew through all the seam allowances...don't stop when the bold line ends. Go to the dotted line
3. It is easier to trim the seam allowance if you use a "add a 1/4" ruler
 | ||
| Paper Piecing Template from EQ6 |
 |
| Rough cut the 2 pieces |
 |
| Place the fabric for A1 face up on the back of the template and the fabric for A2 right sides together with A1 fabric and sew along solid lines **NOTE** SEW ALL THE WAY THROUGH TO THE DOTTED LINE |
 |
| Before you press, fold paper along sewing line and trim to 1/4 inch seam allowance |
 |
| place fabric for A3 right sides together as shown and sew along solid lines |
 |
| Trim seam allowance to 1/4 inch and press |
 |
| place fabric for A4 right sides together as shown and sew along solid lines |
 |
| trim seam allowance to 1/4 inch and press |
 |
| flip over and trim along dotted lines... |
 |
| and now you have a sailboat! |
 |
| mine and Holly's sailboats in the water LOL |
 |
| place and sew the fabric for B1, B2 and B3 (one at a time) and sew along the solid lines |
 |
| trim seam allowances to 1/4 inch and press |
 |
| flip and trim on dotted lines |
 |
| B piece after trimming |
 |
| align edges from piece A and piece B |
 |
| sew along solid line **ALL THE WAY THROUGH THE SEAM ALLOWANCE** |
 |
| remove all paper pieces from fabric |
 |
| press last seam as shown |
 |
| Holly's finished block |
 |
| my finished block |
Template Method:
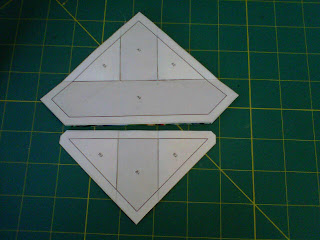
 |
| These are the templates cut out |
 |
| My pieces cut using the templates |
 |
| After sewing and pressing one triangle to each side of the blue pentagon |
 |
| After you sew on the remaining triangles, you should have 2 of these |
 |
| Sew bi-color triangle onto the middle piece |
 |
| Sew on the other side |
 |
| my finished block...YAY! |
 |
| Holly's finished block |
Don't forget, we are having a giveaway on this blog. Go here to get your name in for the giveaway!
Mary
2 comments:
what's the best way to get a picture to you?
hmmm...right now, all we can do is post links to the pictures. I hope to eventually have some kind of gallery to post to, but that is far off.
Post a Comment